Like all IDEs, Code::Blocks is effectively a front for the clang, minGW, or gcc compiler lurking somewhere under its skin. While you don’t use these command line tools directly, you can control their options and settings from within the IDE.
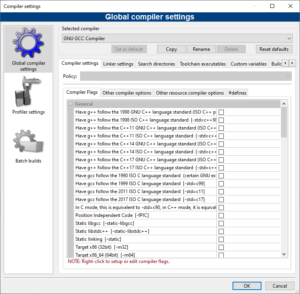
Compiler options are set in the Compiler Settings dialog box, a busy place shown in Figure 1. Place a checkmark in the box to activate an option. The option’s related command line switch (some of which are covered in last week’s Lesson) is listed for each option.
To summon the Compiler Settings dialog box, choose Settings, Compiler in Code::Blocks. The Global Compiler Settings screen is chosen, Compiler Settings tab, Compiler Flags sub-tab set as shown in Figure 1.
If you click the Other Compiler Options tab, you can enter switches manually. Or you can create a new entry on the Compiler Flags sub-tab by right-clicking.
A similar dialog box is provided for Code::Blocks projects. Unlike the Compiler Settings dialog box, the Project Build Options dialog box applies only to the current project. The settings and dialog box are pretty much identical; summon the dialog box by choosing Project, Build Options.
If you plan on debugging your code in Code::Blocks, ensure that the project is created with a debugging build. This configuration automatically applies the -g switch used at the command prompt.
To compile a project without linking, choose Build, Compile Current File. This choice replaces the -c switch at the command prompt.
The only complex settings required in Code::Blocks are choosing specific directories for libraries and header files. At the command prompt, you use switches. In Code::Blocks, these options are set in the Linker Settings tab, found in the Compiler Settings dialog box (shown in Figure 1).
For example, to set the location of a library you’ve downloaded, choose either Project, Build Options or you can choose Settings, Compiler.
Click Add button.
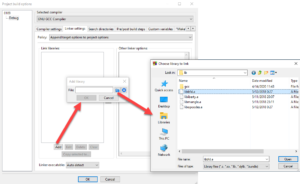
If you know the library’s path (folder), type it in, otherwise do what I do and click the Folder button to browse for the library, as illustrated in Figure 2.
Select the library and click Open.
Click OK in the Add Library dialog box.
Click OK.
The library path is added so that the compiler knows where to find it. Likewise, you can select a folder for header files: In the same dialog box, click the Search Directories tab. In the Compiler sub-tab, click the Add button to set the location where the compiler can hunt down header files.
Again, all these options and settings are translated into command line switches. A build time, Code::Blocks ventures out to the command prompt to run the compiler, all options and switches set per your specifications. For larger programs, this feature is a convenience. For smaller programs, like my demo code, you may see why I prefer the brevity of the command prompt.

